Exhaust gas
temperature gauge, EGT
instrument installation:
With the cost of our engines
getting up into the thousands of dollars - it only makes
sense to invest in "temperature gauges" to help
monitor them. A gauge that I feel should be on all two
stroke aircraft engines is the EGT or Exhaust Gas Temperature gauge.
This gauge is a reliable
measurement tool which measures the exhaust gases as
they exit your engine. A rich fuel/air
mixture which can be caused by improper jetting, clogged
air filter, improper prop setting, will generally show up
as a cooler temperature.
While too lean a mixture,
which can be caused by an air leak or fuel blockage, can
result in overheating and engine seizure.
The proper location of the EGT probe on the
exhaust manifold is extremely important. Think of this
probe as a "thermometer" - like that used to
measure a persons temperature. To get a proper reading -
the probe location is critical!
Mounting the
probe too close to the piston or too far away will result in an
incorrect reading. The probe needs to be
located in the center of the manifold from all
directions. Install the probe before reinstalling the
manifold. As you are drilling, you will use the hose
clamp type probe. This probe needs 7 AN 3 washers placed
on the probe prior to installation.
REMEMBER drill the hole in the center of the wide face,
so the probe goes to the center of the pipe with the
washers, if drilled at an angle the probe will touch the
other side of the manifold.
By this I DO NOT MEAN the center of the Y
pipe -
rather
IN the center of the
manifold as it
comes out of the cylinder head!
The probe should
not bottom out or touch the other side of the manifold,
it should be "suspended in the gas
stream" use a AN-3 washer
under the strap to raise it if necessary.
All
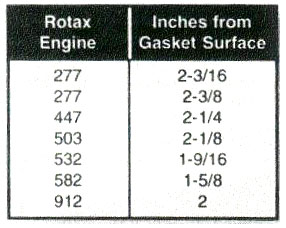
ROTAX two stroke engines should have the probe placed 3.92* from the
piston skirt.
The easiest measurement is from where the
exhaust manifold bolts to the cylinder wall, as
indicated in the above table.
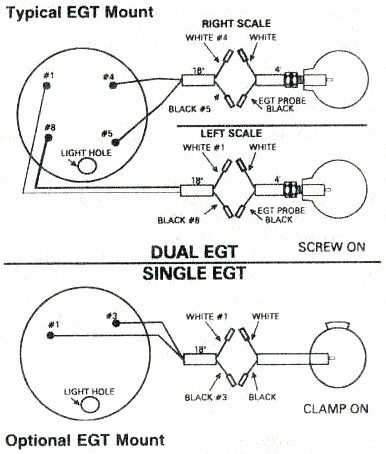
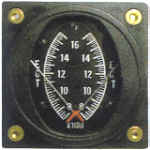
The 2 inch round EGT the gauge will mount
from the front of the panel, an will require a 2 1/16" round hole,
a U bracket holds it in place.
The square 2 inch EGT
needs a 2 1/4* round hole, and mounts from the rear
using four screws from the front to hold it in place.
The 3 inch round EGT requires a 2 7/8" round hole,
and uses a U bracket to hold it in place. The 3' square
gauge requires a 3 1/8" round hole, again mounting from
the rear using four screws.
The EGT gauges require probes
which come with 4' of lead. To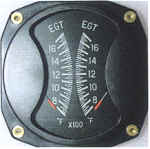 install the probe, drill a 3/16" hole in the center
of the exhaust pipe at the recommended distance use
the table below.
install the probe, drill a 3/16" hole in the center
of the exhaust pipe at the recommended distance use
the table below.
Install the probe into
the 3/16" hole, and tighten up the
clamp. On newer model engines it is not necessary
to drill holes as they are already installed, the newer
manifolds require the newer style of "bayonet
probe."
For pilots needing to
extend the terminal cable, it can be lengthened to a maximum of 15'
without affecting the accuracy of the instrument.
Route all wires away from the manifold and other heat
sources. Support the wires at 12" to 15' intervals,
using tie wraps. When going through firewalls etc, use rubber grommets
to prevent damaging the wiring. D
Do not route these wires
with any wires from an AC source, such as a lighting
coil, spark wires, tech wires, etc. The EGT operates on .004
milli volts. Running near an AC source will
result in incorrect readings.
EGT a must for safe flying!
|
As measured from
exhaust gasket! |
|
 |
An EGT "Pyrometer" gauge monitors the temperature of
the exhaust gases as they exist the combustion chamber.
Thus it is very important that EGT probe be
properly placed in the exhaust system. All Rotax aircraft
engines have a tuned
exhaust system developed specifically for our
application. An EGT can be used to maximize your engine
performance, while monitoring its temperature for signs
of problems.
It is important that you
have correct probe placement as outlined earlier. It is
also important that you verify the EGT readings by careful examination of the spark plugs.
A reading on an EGT of
1100 to 1200 degrees F should give a nice tan coloured
spark plug. Lower readings should give darker colours
while higher readings grey/white colours.
Once you have verified a
spark plug colour and seen where your gauge reads with
the proper colour then it is now more important to watch
for a CHANGE in the gauge reading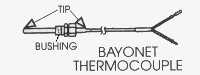 from this "normal reading."
It is important to set
your engine up for proper fuel to air mixture, your egt
gauge and probes can aid in doing this. A lean mixture will run hotter on the
EGT. A rich mixture will run cooler on the EGT but will
make increasingly less power. Ideally the highest EGT
temps should come in at your cruise or "lean
burn" settings usually 5200 to 5800 rpm. While some
might argue that full throttle should give the highest
readings, I have found that if everything is set up
right, with the PROP limiting the engine to the maximum
rpm allowed FULL power application generally result in
LOWER readings. The reasons for this are, the engine fan
is supplying the maximum amount of air, the carb is
supplying the maximum amount of fuel, the plane is
usually traveling a higher speeds resulting in cooler
conditions. None the less 1,000 to 1,200 degrees is the
area you are trying to find. AGAIN using the spark plugs
to "fine tune" the engine.
The EGT can also pick out
"hot spots" in the range. These are areas where
the engine "spikes". This could happen while
backing down on power from full throttle, or while going
from a lower to higher rpm setting. By using the EGT
gauge you can fine tune the jetting to your application
and loads.
Reason for EGT
temperature changes include:
1. Air intake leak.
2. Air fuel mixture too lean
3. Air fuel
mixture too rich
4. Changes in density
altitude
5.
Changes in relative humidity
6. Changes in air
temperature
7. Pre-ignition or detonation
8. Fault spark plug or
ignition system
9. Improper prop load
10. Poor quality or grade
of fuel
11. Improper fuel air
ratio, plugged main jet, failed needle jet, or clip
|