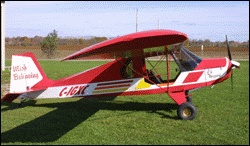
|
The
importance of a thorough pre-flight cannot be over emphasized. You
should follow the factory recommended pre-flight and develop a systematic, habitual approach. Once established,
never vary from your method and of course, always do your own
pre-flight.
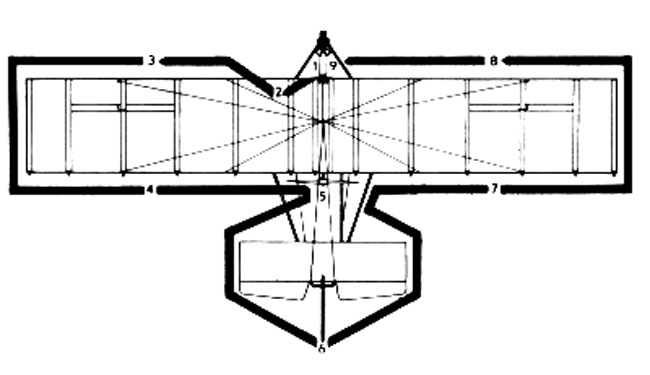
Start
at the nose of the craft and during your pre-flight, work around
the Ouicksilver MX in a counter- clockwise manner. If any
questions arise, consult the assembly instructions.
Note:
Checking the "integrity" of a tube means to check for
bends, dents, scratches, etc. Checking the "integrity"
of a wire means to check wire ends for bolt and/or other
fastener security, and to check for twisted or jammed thimbles.
Wires should be free of kinks, frays, abrasions, broken strands,
etc. Wires should be free of sagging, but not so tight that they
"twang" when plucked.
a)
Place
helmet in seat.
b)
Check controls for free and correct
movement.
c)
Check rudder (move stick side-to-side) teleflex cable
integrity and connecting hardware.
d)
Check elevator (fore and aft with stick) and connecting
hardware.
e)
Check spoilers (press pedals) and control line attachments and
pulleys.
f)
Check integrity of seat, lever throttle, seat mount assembly and
attach point hardware.
g)
Check seat support down tube integrity.
h) Check integrity of nose wires.
i)
Check nose tire inflation and integrity of wheel pant.
j)
Check forward integrity of landing gear-nose struts, foot bar,
tension struts and connecting hardware.
k)
Check integrity of triangle bar tubes and attach points including
lower wing wire connections.
2 a)
Walk under wing and check root tube integrity. Check
all root tube bolts for security including kingpost attachment and
height adjustment.
b)
Check fuel tank mounting security, on-off valve position for 'ON'
and check fuel quantity.
c)
Check all fuel lines, the fuel pump and filter, and carburetor
mount for integrity. Check the fuel tank cross over and if it
contains impurities, drain until contamination is gone. Remember,
water in the gas can cause engine failure!
d)
Check pull starter and all engine components for obvious problems.
Check spark plug caps, all mounting bolts and hardware for
security.
3 a)
Walking to your right, or toward left wing, look and
feel down leading edge spar checking for dents, bends, etc. that may
not be visible because of sail cloth covering.
b)
Check integrity of leading edge wires.
c)
Check spoiler control arm, bungee return, and control line.
d)
Check integrity of compression struts and connectinq
hardware.
4 a)
Walk around left tip and sight and feel down trailing edge
spar. Check integrity of ribs, and make sure they are fully in
position.
b)
Check integrity of trailing edge wires.
5
a) Check
left and right main tire inflation and integrity of wheel pants.
b)
Check axle, axle shaft and axle hardware for integrity.
c)
Check integrity of landing gear down tubes and wires.
d)
Check integrity of reduction unit and condition of belts,
belt tracking and tension.
e)
Check propeller condition (switch off) looking for cracks
or deep nicks. Check prop hub, mounting bolts, and tip
clearance.
f)
Check muffler bracket, shaft coupler and bearings for
security.
g)
Check integrity of tail brace tubes.
h)
Check integrity of tail booms and attach points.
i) Check
that teleflex cable is attached to lower tail wire.
Look
up at kingpost and visually check that all hardware is secure.
6
a) Check horizontal
stabilizer spar and hardware integrity.
b)
Check upper and lower tail wire
integrity.
c)
Check rudder frame tube integrity and check rudder hinge
assemblies carefully.
d)
Check integrity of rudder control cables.
e)
Check elevator frame tube integrity and check elevator hinge
assemblies carefully. elevator push/pull tube and LY of safety
cable.
f)
Check integrity of elevator push/pull tube and hardware and
security of safety cable.
g)
Look up at spoilers and see that they lie flat against the wing
surface.
7
a) Move to right wing and check trailing edge spar and wire
integrity.
b)
Check all compression struts, ribs and spoiler lines for
integrity.
8 a)
Walk around right tip and check leading edge spar and wire
integrity.
9 a)
Check muffler integrity and attach point springs
(safety wired).
b)
Sit in the seat. Adjust and secure shoulder harness/seat
belt.
c)
Buckle your helmet (earplugs are suggested), and connect
parachute "emergency recovery system" to aircraft in
secure manner.
d)
Check airspeed indicator integrity.
e)
Check kill switch integrity.
f)
Actuate all controls several times making sure you can
comfortably reach throttle, control stick, spoiler pedals, pull
starter and kill switch.
NOTE:
This suggested outline for a Pre-Flight Inspection generally
covers the critical areas that MUST be checked prior to each
flight. In addition, EVERY component must be examined after
construction, properly maintained, and correctly stored or
transported to ensure structural integrity and safe flying
characteristics of your Quicksilver MX
|